Nothing is more frustrating to a new gardener than finding an ugly, brown spot on the bottom of an otherwise beautiful tomato. If you see it, you probably have blossom-end rot, a common problem that is easy to prevent.
On tomatoes, blossom-end rot appears as brown, leathery rot, while on peppers, the spots resemble sunscald and appear on the sides. If this is what your tomato or pepper looks like, read on.
What causes blossom-end rot?
Blossom-end rot is a plant disorder caused by calcium deficiency, according to UW-Madison. Tomatoes and pepper plants use active transpiration to move calcium from its roots to the fruit. (Active transpiration is a fancy way of saying water evaporates off of the top of the plant, new water is drawn up from below.)
Blossom-end rot can be caused by:
- Not enough water
- Waterlogged soil
- Inconsistent watering
- Damaged roots
- Wrong soil Ph
- Too much synthetic fertilizer
- Inadequate calcium in the soil
Ironically, not enough or too much water could be the problem. A good way to tell is to grab a handful of soil (1” or 2” deep), and you should be able to make a ball without water coming out.
For plants to properly uptake calcium the soil Ph should be between 6.5 and 6.8. Over fertilizing, especially synthetic fertilizer can also interfere with your plants ability to absorb calcium.
Quick Fix
Once you determine you need more calcium the only way to get it into your plants this season is a liquid Cal Mag Plus (Calcium Magnesium with positive ions) Your local garden supply store should have it in stock. Apply it to the roots according to the instructions. You can also make a foliar spray and apply it the leaves. This should save the rest of your harvest.
Long Term Blossom-End Rot Prevention
Once you have solved your issues for this season, you need to make sure you have enough calcium in your soil for next year and going forward. Even if you don’t have blossom-end rot you should be adding calcium to your soil as part of your soil amendment program. One way is to add garden lime from your local garden store, but we have a better and more sustainable way—eggshells.
Eggshells are an incredible source of calcium for your plants.
Here is how I do it:
The first step is rinsing the eggshells and drying them out on a dish by my windowsill, or any place where the sun can do its part. Sunlight both dries the shells and helps kill any Salmonella that could be in the shells.

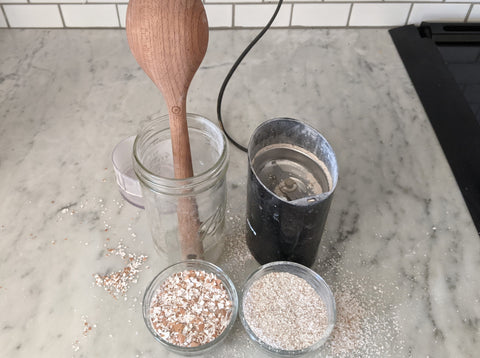
After drying them out for about 2 days, I add them to a jar and crush them using the end of a wooden spoon. (You can be as innovative as you wish to be!) I have a pint-sized straight mason jar on the counter that can hold many dozens of egg shells. I would recommend keeping it open to air by using a lid with holes on it or no lid at all - I haven’t found it attracting any bugs yet.
You can stop here, but the finer you make it, the sooner the tomato plant can absorb it. So, what I do is pulverize the chunks using a coffee bean grinder. I strongly suggest using a separate, dedicated grinder. It can be tricky to clean the eggshells from the grinder—the shells may have Salmonella and homegrown unwashed eggs may add a certain ‘Je ne sais quoi’ to your coffee. Yikes.
My homemade 'mortar and pestle' vs electric grinder:

What you don’t want to do is throw giant chunks of shells in your garden. They do not work as efficiently as the powdered form, and they are a bit of an eyesore. (Believe me, I’ve been there, these shells have been here at least 2 years and aren’t doing anything for the soil.)

Again, a quick comparison between hand crushed and ground. I could have hand ground a little better, but never close to what the electric grinder can do.

Voila! Your powdered eggshells are ready. You can add them directly to the soil around your garden, but it is better to add them to your worm bin or a compost pile — I do both. Adding it to your worm bin has the additional benefit of acting as grit for the worms, balances the pH, and (I believe) should increase the bioavailability of the calcium to the plants after it's gone through the gut of a worm.

A quick note - it’s always a good idea to do soil tests before adding lime or any amendment.
Don’t let a little blossom-end rot discourage you from gardening.
Let me know how it goes. As always, happy gardening!
